
How to Fix SQL Server Error “The target principal name is incorrect.”
When connecting to SQL Server over encrypted connections, you may encounter the following error:
A connection was successfully established with the server, but then an error occurred during the login process.
(provider: SSL Provider, error: 0 - The target principal name is incorrect.) (Microsoft SQL Server)

The target principal name is incorrect.
This article explains the common causes of this error, how to diagnose it, and the recommended fixes.
1. What is an encrypted connection in SQL Server?
- Encrypts traffic between the client and SQL Server using TLS.
- By default, older client drivers only encrypt sensitive parts (like credentials). Newer Microsoft ODBC/OLE DB drivers default to
Encrypt=True, meaning the entire TDS session is encrypted unless configured otherwise. - To properly validate the server’s identity, SQL Server must present a TLS certificate whose Subject/Subject Alternative Name (SAN) matches the connection string the client used to connect.
- If no certificate is configured, SQL Server can create and use a self-signed certificate, but clients will only accept it if they are configured to
TrustServerCertificate=True.
For a deeper dive into encrypted connections in SQL Server, see: Encrypted connections in SQL Server.
2. Why does “The target principal name is incorrect” occur?
- Name mismatch: The certificate presented by SQL Server must include (in SAN or Subject CN) the exact DNS name that the client uses in its connection string. If you connect using
sql01.contoso.localbut the certificate only containssql01, validation fails. - Connecting by IP: If you connect via IP address, the certificate must include that IP in SAN; otherwise validation fails (prefer DNS where possible).
- Listener names (AG/FCI): For Availability Groups or Failover Cluster Instances, the certificate must include the listener or virtual network name in SAN, not just the node’s host name.
- Untrusted issuer: Even if names match, clients will reject a cert that chains to an untrusted CA when
TrustServerCertificate=False.

3. How to verify your certificate configuration
Use SQL Server Configuration Manager and the Windows certificate console to check which certificate is bound and what names it contains:
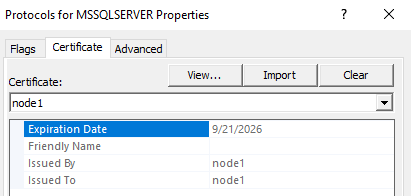
- Open SQL Server Configuration Manager.
- Go to SQL Server Network Configuration → Protocols for <InstanceName>, right-click and choose Properties.
- Open the Certificate tab and confirm which certificate is selected.
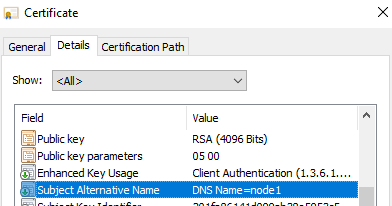
Then inspect the certificate’s Subject Alternative Name (SAN):
- Press Win + R, run
certlm.msc(Computer account). - Locate the certificate in Personal → Certificates, right-click → Open.
- On the Details tab, check Subject Alternative Name and verify it includes every DNS name (and IPs if you connect by IP) that clients use.
4. Fixes
- Re-issue or replace the certificate with correct SAN entries.
Include all names clients use: FQDN of the instance host, AG listener/cluster name, any aliases, and (if truly necessary) IP addresses. - Update the client connection string to a name that exists in the certificate.
Use the FQDN that matches the SAN. With newer drivers/SSMS you can also set “Host name in certificate” (orHostNameInCertificate) if your certificate uses a specific name (e.g., the AG listener) while yourServer=points elsewhere. - Temporary workaround:
TrustServerCertificate=True.
This bypasses CA and name validation and will encrypt the channel, but it does not authenticate the server and is vulnerable to MITM. Use only as a short-term workaround while fixing certificates.
5. Creating a server certificate with SAN (example)
For lab or internal CA scenarios, you can generate a certificate with the required DNS names. Example (PowerShell):
New-SelfSignedCertificate `
  -Type SSLServerAuthentication `
  -Subject "CN=sql01.contoso.local" `
  -DnsName  "sql01.contoso.local","ag-listener.contoso.local","sql01","192.168.1.xxx" `
  -KeyLength 4096 `
  -KeySpec   KeyExchange `
  -HashAlgorithm SHA256
After creating/importing the certificate, bind it in SQL Server Configuration Manager (Protocols → Properties → Certificate) and restart the SQL Server service.